1.添加上传 和传统的单体应用不同,这里我们选择将数据上传到分布式文件服务器上。
这里我们选择将图片放置到阿里云上,使用对象存储。
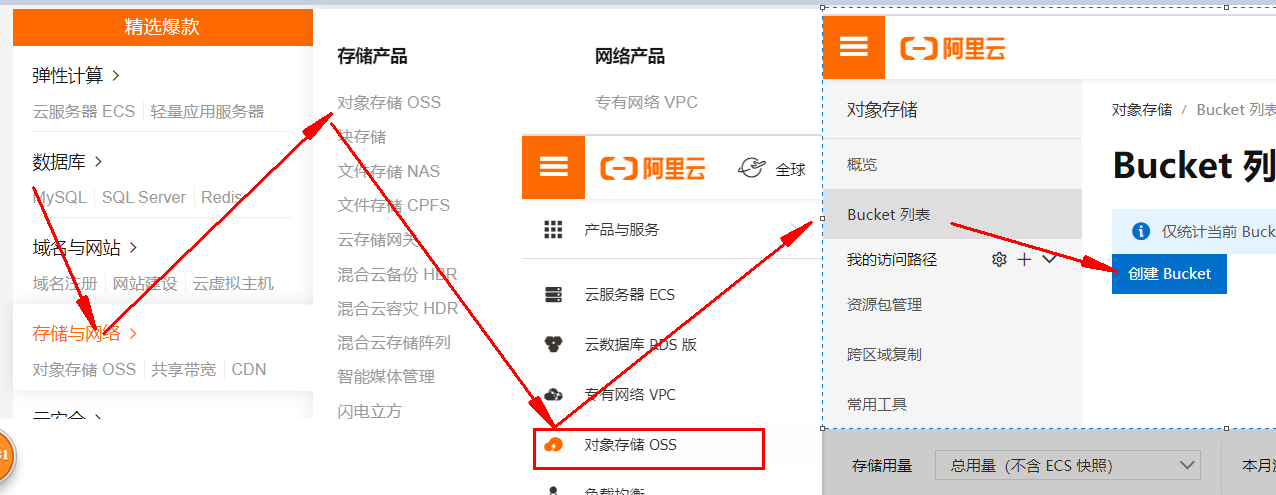
阿里云上使使用对象存储方式:
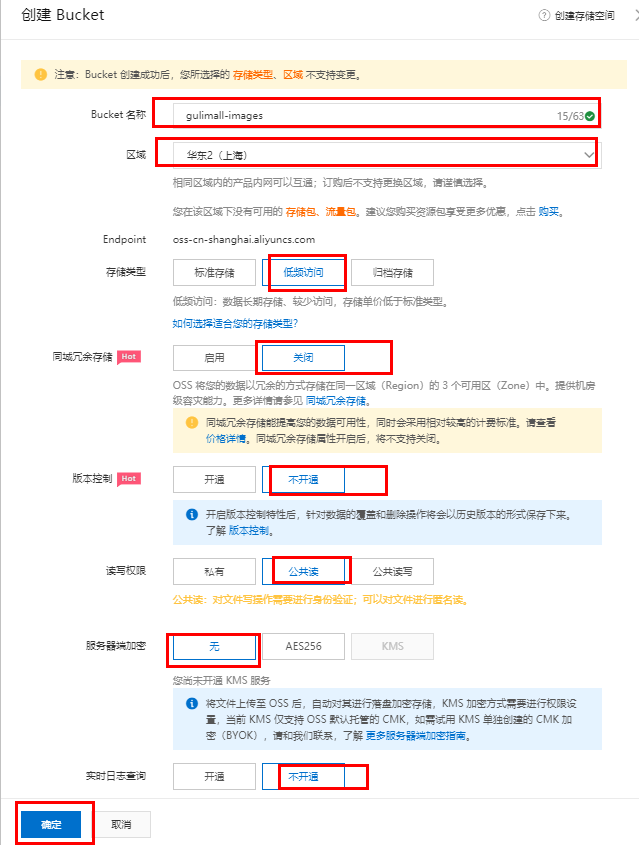
创建Bucket
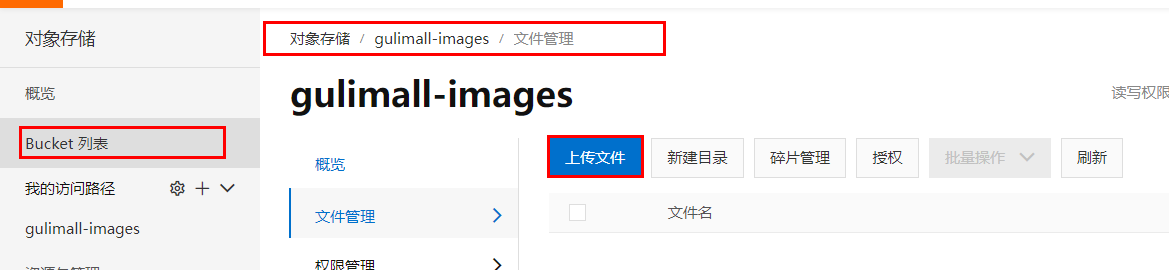
上传文件:
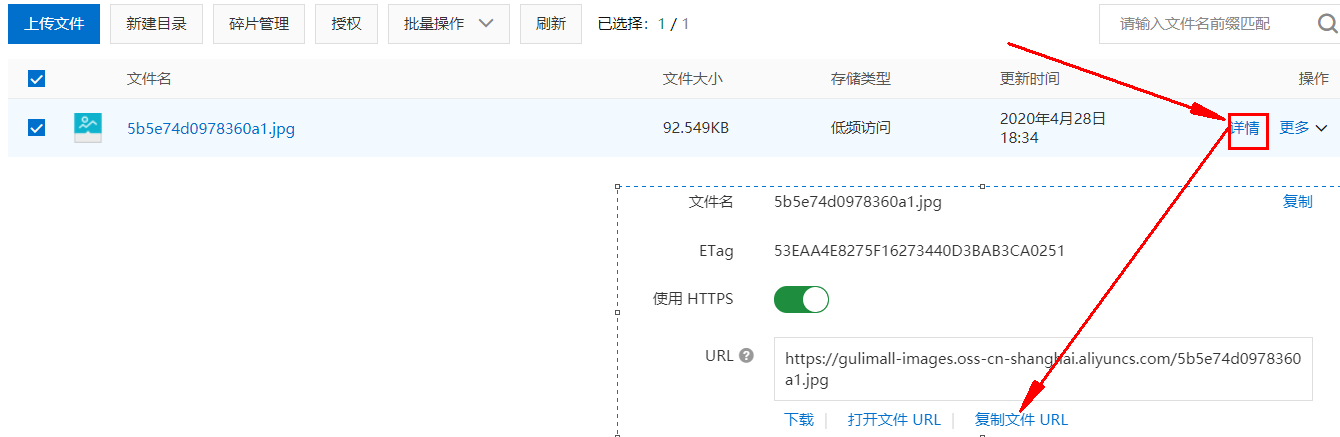
上传成功后,取得图片的URL
这种方式是手动上传图片,实际上我们可以在程序中设置自动上传图片到阿里云对象存储。
查看阿里云关于文件上传的帮助: https://help.aliyun.com/document_detail/32009.html?spm=a2c4g.11186623.6.768.549d59aaWuZMGJ
1)添加依赖包 在Maven项目中加入依赖项(推荐方式)
在 Maven 工程中使用 OSS Java SDK,只需在 pom.xml 中加入相应依赖即可。以 3.8.0 版本为例,在 内加入如下内容:
1 2 3 4 5 <dependency > <groupId > com.aliyun.oss</groupId > <artifactId > aliyun-sdk-oss</artifactId > <version > 3.8.0</version > </dependency >
2)上传文件流 以下代码用于上传文件流:
1 2 3 4 5 6 7 8 9 10 11 12 13 14 15 String endpoint = "http://oss-cn-hangzhou.aliyuncs.com" ; String accessKeyId = "<yourAccessKeyId>" ; String accessKeySecret = "<yourAccessKeySecret>" ; OSS ossClient = new OSSClientBuilder().build(endpoint, accessKeyId, accessKeySecret); InputStream inputStream = new FileInputStream("<yourlocalFile>" ); ossClient.putObject("<yourBucketName>" , "<yourObjectName>" , inputStream); ossClient.shutdown();
endpoint的取值:
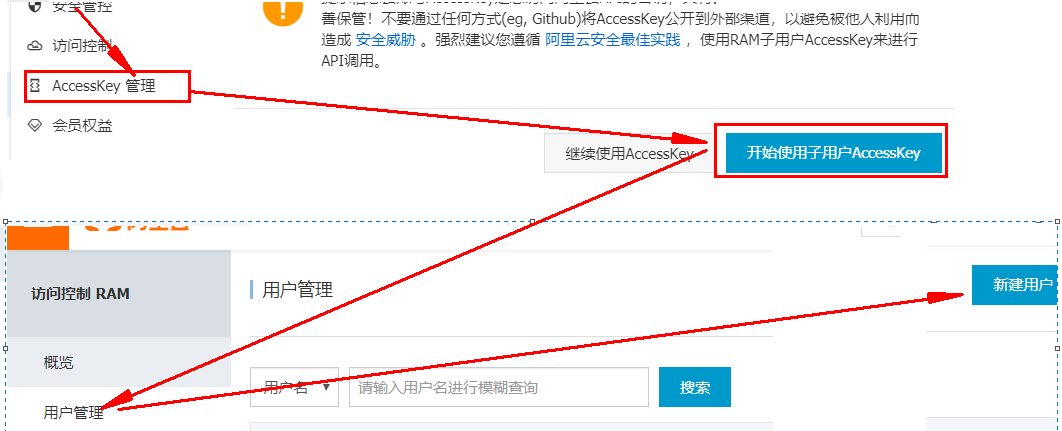
accessKeyId和accessKeySecret需要创建一个RAM账号:
创建用户完毕后,会得到一个“AccessKey ID”和“AccessKeySecret”,然后复制这两个值到代码的“AccessKey ID”和“AccessKeySecret”。
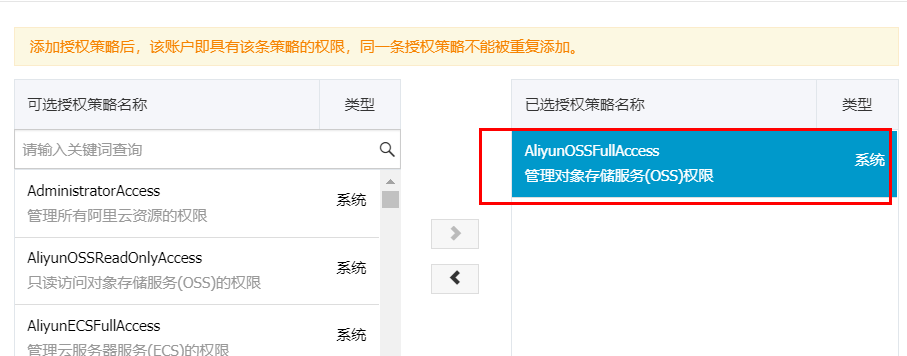
另外还需要添加访问控制权限:
1
2
3
4
5
6
7
8
9
10
11
12
13
14
15
16
17
18
19
@Test public void testUpload () throws FileNotFoundException String endpoint = "oss-cn-shanghai.aliyuncs.com" ; String accessKeyId = "LTAI4G4W1RA4JXz2QhoDwHhi" ; String accessKeySecret = "R99lmDOJumF2x43ZBKT259Qpe70Oxw" ; OSS ossClient = new OSSClientBuilder().build(endpoint, accessKeyId, accessKeySecret); InputStream inputStream = new FileInputStream("C:\\Users\\Administrator\\Pictures\\timg.jpg" ); ossClient.putObject("gulimall-images" , "time.jpg" , inputStream); ossClient.shutdown(); System.out.println("上传成功." ); }
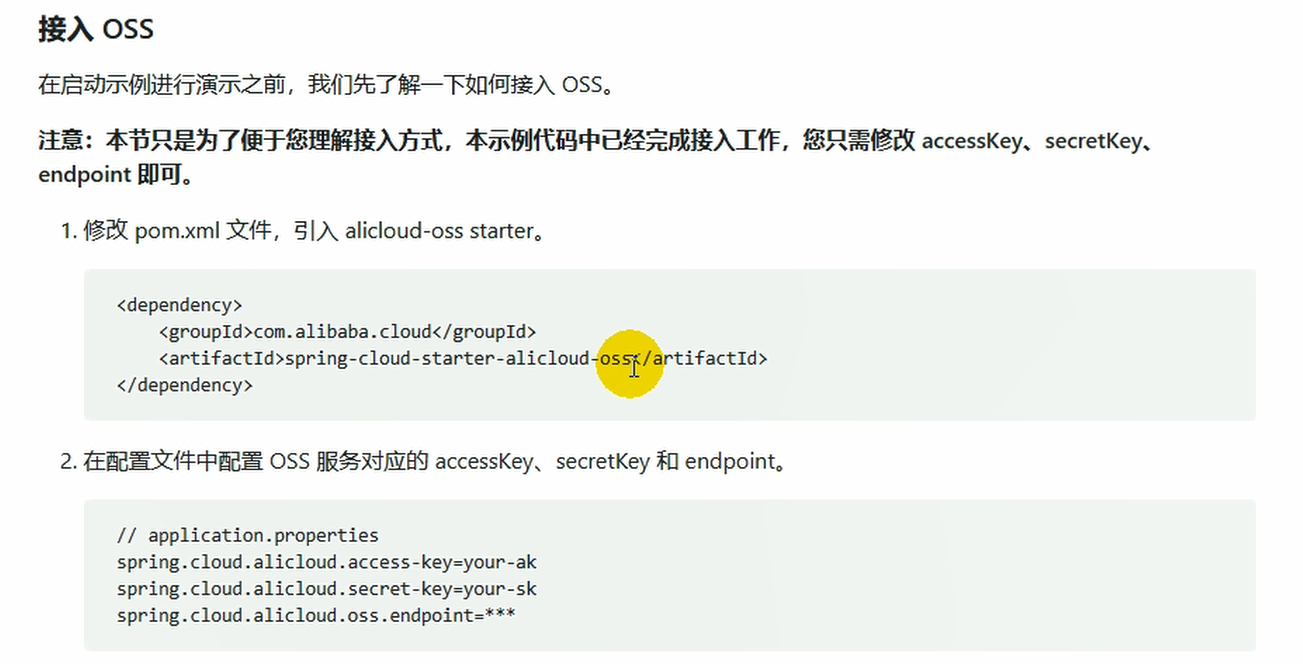
更为简单的使用方式,是使用SpringCloud Alibaba
详细使用方法,见: https://help.aliyun.com/knowledge_detail/108650.html
(1)添加依赖
1 2 3 4 5 <dependency > <groupId > com.alibaba.cloud</groupId > <artifactId > spring-cloud-starter-alicloud-oss</artifactId > <version > 2.2.0.RELEASE</version > </dependency >
(2)创建“AccessKey ID”和“AccessKeySecret”
(3)配置key,secret和endpoint相关信息
1
2
3
4
access-key: LTAI4G4W1RA4JXz2QhoDwHhi secret-key: R99lmDOJumF2x43ZBKT259Qpe70Oxw oss: endpoint: oss-cn-shanghai.aliyuncs.com
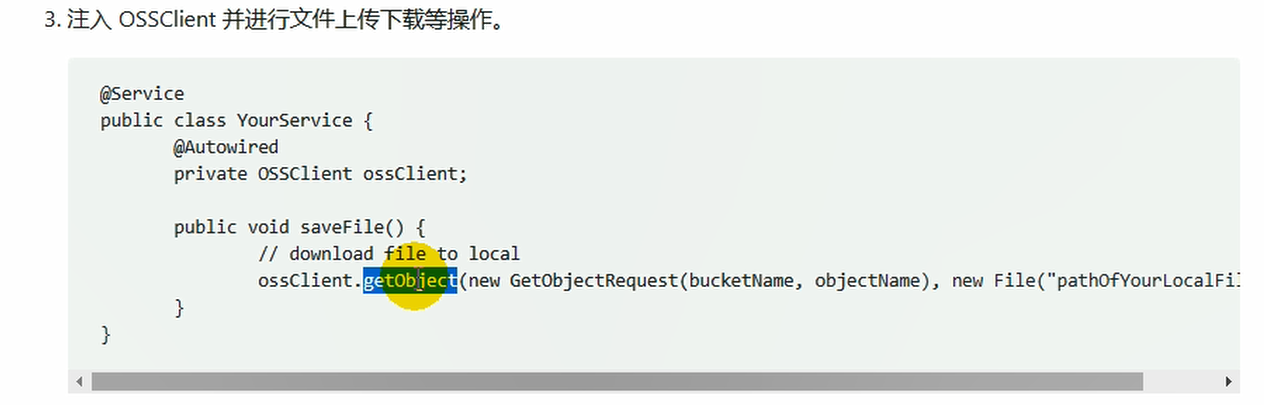
(4)注入OSSClient并进行文件上传下载等操作
但是这样来做还是比较麻烦,如果以后的上传任务都交给gulimall-product来完成,显然耦合度高。最好单独新建一个Module来完成文件上传任务。
2. 其他方式 1)新建gulimall-third-party 2)添加依赖,将原来gulimall-common中的“spring-cloud-starter-alicloud-oss”依赖移动到该项目中 1 2 3 4 5 6 7 8 9 10 11 12 13 14 15 16 17 18 19 20 21 22 <dependency > <groupId > com.alibaba.cloud</groupId > <artifactId > spring-cloud-starter-alicloud-oss</artifactId > <version > 2.2.0.RELEASE</version > </dependency > <dependency > <groupId > com.atguigu.gulimail</groupId > <artifactId > gulimail-common</artifactId > <version > 0.0.1-SNAPSHOT</version > <exclusions > <exclusion > <groupId > com.baomidou</groupId > <artifactId > mybatis-plus-boot-starter</artifactId > </exclusion > <exclusion > <groupId > mysql</groupId > <artifactId > mysql-connector-java</artifactId > </exclusion > </exclusions > </dependency >
另外也需要在“pom.xml”文件中,添加如下的依赖管理
1 2 3 4 5 6 7 8 9 10 11 12 13 14 15 16 17 18 19 <dependencyManagement > <dependencies > <dependency > <groupId > org.springframework.cloud</groupId > <artifactId > spring-cloud-dependencies</artifactId > <version > ${spring-cloud.version}</version > <type > pom</type > <scope > import</scope > </dependency > <dependency > <groupId > com.alibaba.cloud</groupId > <artifactId > spring-cloud-alibaba-dependencies</artifactId > <version > 2.2.1.RELEASE</version > <type > pom</type > <scope > import</scope > </dependency > </dependencies > </dependencyManagement >
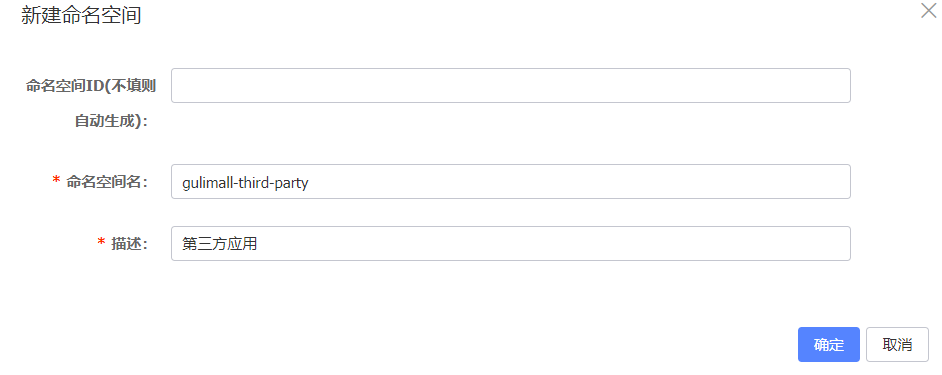
3)在主启动类中开启服务的注册和发现 4)在nacos中注册 (1)创建命名空间“ gulimall-third-party ”
(2)在“ gulimall-third-party”命名空间中,创建“ gulimall-third-party.yml”文件
1 2 3 4 5 6 7 8 spring: cloud: alicloud: access-key: LTAI4G4W1RA4JXz2QhoDwHhi secret-key: R99lmDOJumF2x43ZBKT259Qpe70Oxw oss: endpoint: oss-cn-shanghai.aliyuncs.com
5)编写配置文件 application.yml
1 2 3 4 5 6 7 8 9 10 11 12 13 14 15 server: port: 30000 spring: application: name: gulimall-third-party cloud: nacos: discovery: server-addr: 192.168 .137 .14 :8848 logging: level: com.bigdata.gulimall.product: debug
bootstrap.properties
1 2 3 4 5 6 spring.cloud.nacos.config.name =gulimall-third-party spring.cloud.nacos.config.server-addr =192.168.137.14:8848 spring.cloud.nacos.config.namespace =f995d8ee-c53a-4d29-8316-a1ef54775e00 spring.cloud.nacos.config.extension-configs[0].data-id =gulimall-third-party.yml spring.cloud.nacos.config.extension-configs[0].group =DEFAULT_GROUP spring.cloud.nacos.config.extension-configs[0].refresh =true
6) 编写测试类 1 2 3 4 5 6 7 8 9 10 11 12 13 14 15 16 17 18 19 20 21 22 23 24 25 26 27 28 29 30 31 32 33 34 35 36 37 38 39 40 41 42 package com.bigdata.gulimall.thirdparty;import com.aliyun.oss.OSS;import com.aliyun.oss.OSSClient;import com.aliyun.oss.OSSClientBuilder;import org.junit.jupiter.api.Test;import org.springframework.beans.factory.annotation.Autowired;import org.springframework.boot.test.context.SpringBootTest;import java.io.FileInputStream;import java.io.FileNotFoundException;import java.io.InputStream;@SpringBootTest class GulimallThirdPartyApplicationTests @Autowired OSSClient ossClient; @Test public void testUpload () throws FileNotFoundException String endpoint = "oss-cn-shanghai.aliyuncs.com" ; String accessKeyId = "LTAI4G4W1RA4JXz2QhoDwHhi" ; String accessKeySecret = "R99lmDOJumF2x43ZBKT259Qpe70Oxw" ; OSS ossClient = new OSSClientBuilder().build(endpoint, accessKeyId, accessKeySecret); InputStream inputStream = new FileInputStream("C:\\Users\\Administrator\\Pictures\\timg.jpg" ); ossClient.putObject("gulimall-images" , "time3.jpg" , inputStream); ossClient.shutdown(); System.out.println("上传成功." ); } }
3. oss服务端签名后直传 https://help.aliyun.com/document_detail/31926.html?spm=a2c4g.11186623.6.1527.228d74b8V6IZuT
1) 背景 采用JavaScript客户端直接签名(参见JavaScript客户端签名直传 )时,AccessKeyID和AcessKeySecret会暴露在前端页面,因此存在严重的安全隐患。因此,OSS提供了服务端签名后直传的方案。
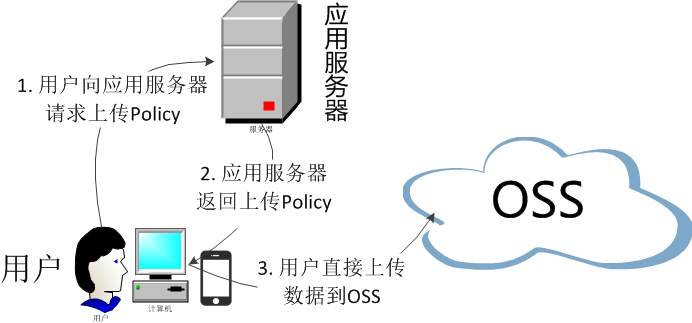
2) 原理介绍
服务端签名后直传的原理如下:
用户发送上传Policy请求到应用服务器。
应用服务器返回上传Policy和签名给用户。
用户直接上传数据到OSS。
3) 接口编写 编写“com.bigdata.gulimall.thirdparty.controller.OssController”类:
1 2 3 4 5 6 7 8 9 10 11 12 13 14 15 16 17 18 19 20 21 22 23 24 25 26 27 28 29 30 31 32 33 34 35 36 37 38 39 40 41 42 43 44 45 46 47 48 49 50 51 52 53 54 55 56 57 58 59 60 61 62 63 64 65 66 67 68 69 70 package com.bigdata.gulimall.thirdparty.controller;import com.aliyun.oss.OSS;import com.aliyun.oss.common.utils.BinaryUtil;import com.aliyun.oss.model.MatchMode;import com.aliyun.oss.model.PolicyConditions;import org.springframework.beans.factory.annotation.Autowired;import org.springframework.beans.factory.annotation.Value;import org.springframework.web.bind.annotation.RequestMapping;import org.springframework.web.bind.annotation.RestController;import java.text.SimpleDateFormat;import java.util.Date;import java.util.LinkedHashMap;import java.util.Map;@RestController public class OssController @Autowired OSS ossClient; @Value ("${spring.cloud.alicloud.oss.endpoint}" ) String endpoint ; @Value("${spring.cloud.alicloud.oss.bucket}") String bucket ; @Value("${spring.cloud.alicloud.access-key}") String accessId ; @Value("${spring.cloud.alicloud.secret-key}") String accessKey ; @RequestMapping("/oss/policy") public Map<String, String> policy () String host = "https://" + bucket + "." + endpoint; String format = new SimpleDateFormat("yyyy-MM-dd" ).format(new Date()); String dir = format; Map<String, String> respMap=null ; try { long expireTime = 30 ; long expireEndTime = System.currentTimeMillis() + expireTime * 1000 ; Date expiration = new Date(expireEndTime); PolicyConditions policyConds = new PolicyConditions(); policyConds.addConditionItem(PolicyConditions.COND_CONTENT_LENGTH_RANGE, 0 , 1048576000 ); policyConds.addConditionItem(MatchMode.StartWith, PolicyConditions.COND_KEY, dir); String postPolicy = ossClient.generatePostPolicy(expiration, policyConds); byte [] binaryData = postPolicy.getBytes("utf-8" ); String encodedPolicy = BinaryUtil.toBase64String(binaryData); String postSignature = ossClient.calculatePostSignature(postPolicy); respMap= new LinkedHashMap<String, String>(); respMap.put("accessid" , accessId); respMap.put("policy" , encodedPolicy); respMap.put("signature" , postSignature); respMap.put("dir" , dir); respMap.put("host" , host); respMap.put("expire" , String.valueOf(expireEndTime / 1000 )); } catch (Exception e) { System.out.println(e.getMessage()); } finally { ossClient.shutdown(); } return respMap; } }
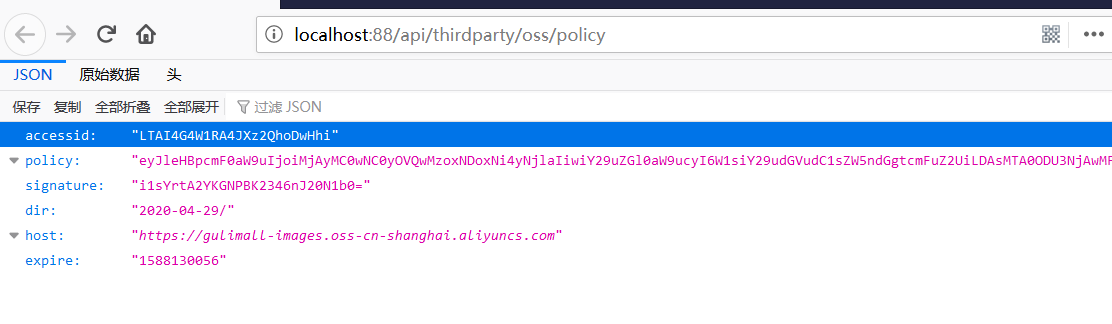
测试: http://localhost:30000/oss/policy
1 {"accessid":"LTAI4G4W1RA4JXz2QhoDwHhi","policy":"eyJleHBpcmF0aW9uIjoiMjAyMC0wNC0yOVQwMjo1ODowNy41NzhaIiwiY29uZGl0aW9ucyI6W1siY29udGVudC1sZW5ndGgtcmFuZ2UiLDAsMTA0ODU3NjAwMF0sWyJzdGFydHMtd2l0aCIsIiRrZXkiLCIyMDIwLTA0LTI5LyJdXX0=","signature":"s42iRxtxGFmHyG40StM3d9vOfFk=","dir":"2020-04-29/","host":"https://gulimall-images.oss-cn-shanghai.aliyuncs.com","expire":"1588129087"}
以后在上传文件时的访问路径为“ http://localhost:18090/api/thirdparty/oss/policy”,
在“gulimall-gateway”中配置路由规则:
1 2 3 4 5 6 - id: third_party_route uri: lb://gulimall-gateway predicates: - Path=/api/third-party/** filters: - RewritePath=/api/third-party/(?<segment>/?.*),/$\{segment}
测试是否能够正常跳转: http://localhost:88/api/thirdparty/oss/policy
4. 前端上传组件 放置项目提供的upload文件夹到components目录下,一个是单文件上传,另外一个是多文件上传
gulimall项目地址
1 2 3 4 5 6 7 8 9 10 11 12 13 14 15 16 17 PS D:\Project\gulimall\renren-fast-vue\src\components\upload> ls 目录: D:\Project\gulimall\renren-fast-vue\src\components\upload Mode LastWriteTime Length Name ---- ------------- ------ ---- -a---- 2020/4/29 星期三 12:0 3122 multiUpload.vue 2 -a---- 2019/11/11 星期一 21: 343 policy.js 20 -a---- 2020/4/29 星期三 12:0 3053 singleUpload.vue 1 PS D:\Project\gulimall\renren-fast-vue\src\components\upload>
修改这两个文件的配置后
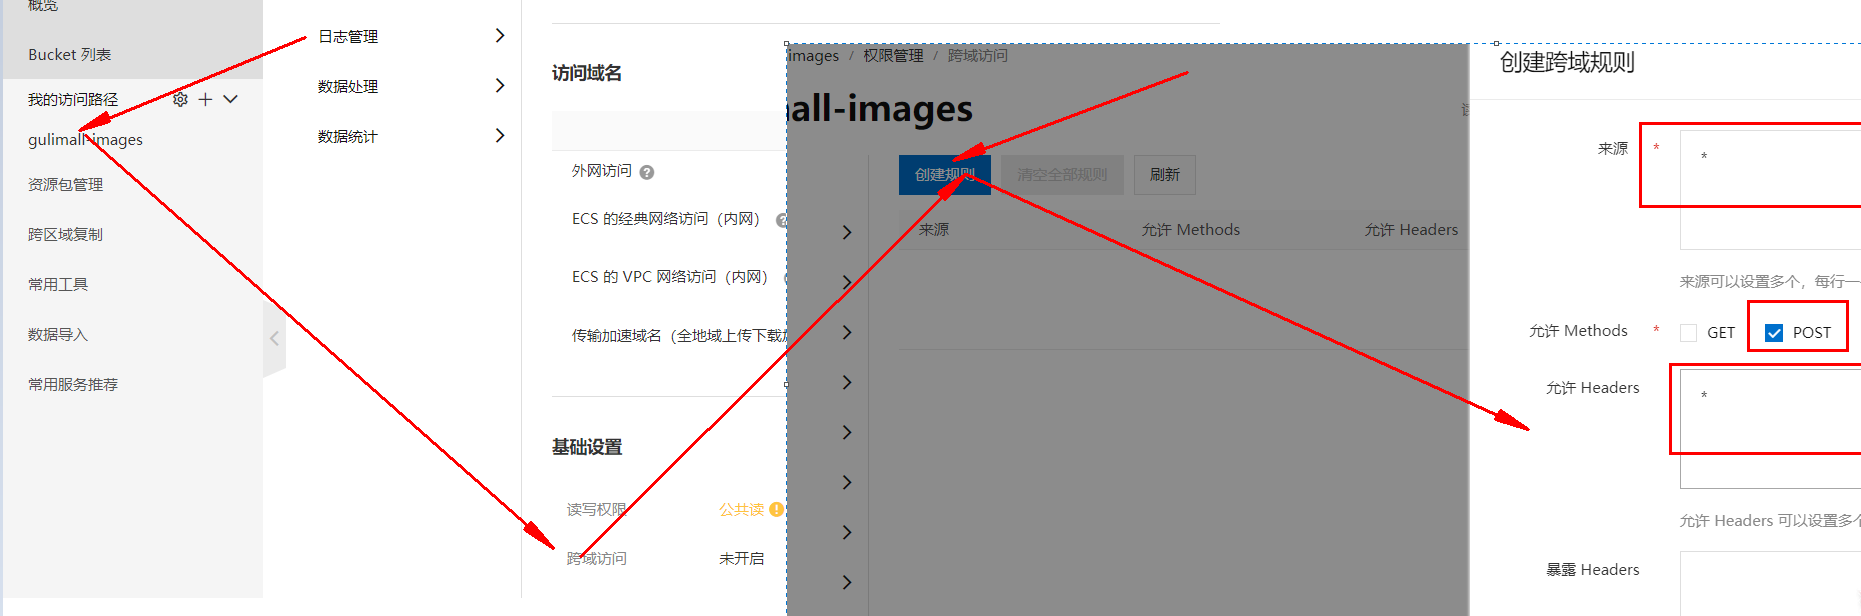
开始执行上传,但是在上传过程中,出现了如下的问题:
1 Access to XMLHttpRequest at 'http://gulimall-images.oss-cn-shanghai.aliyuncs.com/' from origin 'http://localhost:8001' has been blocked by CORS policy: Response to preflight request doesn't pass access control check: No 'Access-Control-Allow-Origin' header is present on the requested resource.
这又是一个跨域的问题,解决方法就是在阿里云上开启跨域访问:
再次执行文件上传。