FastThreadLocal 为什么快

FastThreadLocal 的实现与 ThreadLocal 非常类似,Netty 为 FastThreadLocal 量身打造了 FastThreadLocalThread 和 InternalThreadLocalMap 两个重要的类。

FastThreadLocalThread 是对 Thread 类的一层包装,每个线程对应一个 InternalThreadLocalMap 实例。只有 FastThreadLocal 和 FastThreadLocalThread 组合使用时,才能发挥 FastThreadLocal 的性能优势。

FastThreadLocalThread 的源码:

1
2
3
4
5
6
7
public class FastThreadLocalThread extends Thread {

private InternalThreadLocalMap threadLocalMap;

// 省略其他代码

}

可以看出 FastThreadLocalThread 主要扩展了 InternalThreadLocalMap 字段,我们可以猜测到 FastThreadLocalThread 主要使用 InternalThreadLocalMap 存储数据,而不再是使用 Thread 中的 ThreadLocalMap。所以想知道 FastThreadLocalThread 高性能的奥秘,必须要了解 InternalThreadLocalMap 的设计原理。

我们知道 ThreadLocal 的一个重要缺点,就是 ThreadLocalMap 采用线性探测法解决 Hash 冲突使得性能较慢,那么 InternalThreadLocalMap 又是如何优化的呢?首先一起看下 InternalThreadLocalMap 的内部构造。

1
2
3
4
5
6
7
8
9
10
11
12
13
14
15
16
17
18
19
20
21
22
23
24
25
26
27
28
29
30
31
32
33
34
35
36
37
38
39
40
41
42
43
44
45
46
47
48
49
50
public final class InternalThreadLocalMap extends UnpaddedInternalThreadLocalMap {

private static final int DEFAULT_ARRAY_LIST_INITIAL_CAPACITY = 8;
private static final int STRING_BUILDER_INITIAL_SIZE;
private static final int STRING_BUILDER_MAX_SIZE;
public static final Object UNSET = new Object();
private BitSet cleanerFlags;

private InternalThreadLocalMap() {

super(newIndexedVariableTable());

}

private static Object[] newIndexedVariableTable() {

Object[] array = new Object[32];
Arrays.fill(array, UNSET);
return array;

}
public static int nextVariableIndex() {

int index = nextIndex.getAndIncrement();
if (index < 0) {
nextIndex.decrementAndGet();
throw new IllegalStateException("too many thread-local indexed variables");
}
return index;
}

// 省略其他代码

}

class UnpaddedInternalThreadLocalMap {

static final ThreadLocal<InternalThreadLocalMap> slowThreadLocalMap = new ThreadLocal<InternalThreadLocalMap>();
// 用于递增索引
static final AtomicInteger nextIndex = new AtomicInteger();
// 保存具体值的 Object 数组
Object[] indexedVariables;

UnpaddedInternalThreadLocalMap(Object[] indexedVariables) {
this.indexedVariables = indexedVariables;
}

// 省略其他代码

}

通过源码可以看出,InternalThreadLocalMap 与 ThreadLocalMap 一样都是采用数组的存储方式。

但是 InternalThreadLocalMap 并没有使用线性探测法来解决 Hash 冲突,而是在 FastThreadLocal 初始化的时候分配一个数组索引 ,index 的值采用原子类 AtomicInteger 保证顺序递增,通过调用 InternalThreadLocalMap.nextVariableIndex() 方法获得。然后在读写数据的时候通过数组下标 index 直接定位到 FastThreadLocal 的位置,时间复杂度为 O(1)。

如果数组下标递增到非常大,那么数组也会比较大,所以 FastThreadLocal 是通过空间换时间的思想提升读写性能。下面通过一幅图描述 InternalThreadLocalMap、index 和 FastThreadLocal 之间的关系。

image-20220615152609978

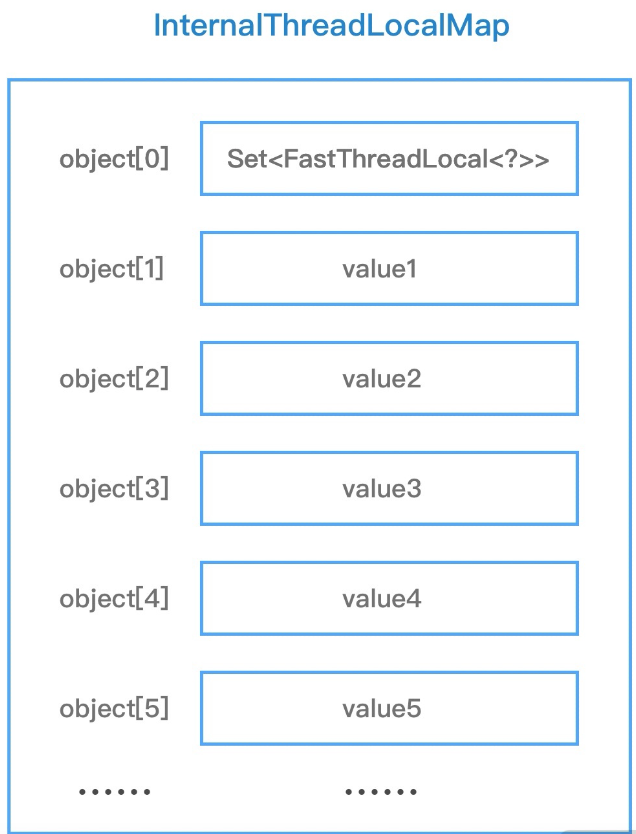
对比 ThreadLocal , FastThreadLocal 使用 Object 数组替代了 Entry 数组,Object[0] 存储的是一个Set<FastThreadLocal<?>> 集合,从数组下标 1 开始都是直接存储的 value 数据,不再采用 ThreadLocal 的键值对形式进行存储。

FastThreadLocal 源码分析

FastThreadLocal 的示例代码:

1
2
3
4
5
6
7
8
9
10
11
12
13
14
15
16
17
18
19
20
21
22
23
24
25
26
27
28
public class FastThreadLocalTest {

private static final FastThreadLocal<String> THREAD_NAME_LOCAL = new FastThreadLocal<>();

private static final FastThreadLocal<TradeOrder> TRADE_THREAD_LOCAL = new FastThreadLocal<>();

public static void main(String[] args) {

for (int i = 0; i < 2; i++) {

int tradeId = i;

String threadName = "thread-" + i;
// 注意,这里使用 FastThreadLocalThread,否则性能不会得到提升,反而会更差
new FastThreadLocalThread(() -> {

THREAD_NAME_LOCAL.set(threadName);
TradeOrder tradeOrder = new TradeOrder(tradeId, tradeId % 2 == 0 ? "已支付" : "未支付");
TRADE_THREAD_LOCAL.set(tradeOrder);
System.out.println("threadName: " + THREAD_NAME_LOCAL.get());
System.out.println("tradeOrder info:" + TRADE_THREAD_LOCAL.get());
}, threadName).start();

}

}

}

FastThreadLocal 的使用方法几乎和 ThreadLocal 保持一致,只需要把代码中 Thread、ThreadLocal 替换为 FastThreadLocalThread 和 FastThreadLocal 即可。

FastThreadLocal.set()

首先给出 set 方法的源码:

1
2
3
4
5
6
7
8
9
10
public final void set(V value) {

if (value != InternalThreadLocalMap.UNSET) { // 1. value 是否为缺省值
InternalThreadLocalMap threadLocalMap = InternalThreadLocalMap.get(); // 2. 获取当前线程的 InternalThreadLocalMap
setKnownNotUnset(threadLocalMap, value); // 3. 将 InternalThreadLocalMap 中数据替换为新的 value
} else {
remove();
}

}

FastThreadLocal.set() 方法虽然入口只有几行代码,但是内部逻辑是相当复杂的。我们首先还是抓住代码主干,一步步进行拆解分析。set() 的过程主要分为三步:

  1. 判断 value 是否为缺省值,如果等于缺省值,那么直接调用 remove() 方法。这里我们还不知道缺省值和 remove() 之间的联系是什么,我们暂且把 remove() 放在最后分析。
  2. 如果 value 不等于缺省值,接下来会获取当前线程的 InternalThreadLocalMap。
  3. 然后将 InternalThreadLocalMap 中对应数据替换为新的 value。

InternalThreadLocalMap.get()

首先我们看下 InternalThreadLocalMap.get() 方法,源码如下:

1
2
3
4
5
6
7
8
9
10
11
12
13
14
15
16
17
18
19
20
21
22
23
24
25
26
27
28
29
30
31
32
33
34
35
36
37
38
public static InternalThreadLocalMap get() {

Thread thread = Thread.currentThread();

if (thread instanceof FastThreadLocalThread) { // 当前线程是否为 FastThreadLocalThread 类型
return fastGet((FastThreadLocalThread) thread);
} else {
return slowGet();
}

}

private static InternalThreadLocalMap fastGet(FastThreadLocalThread thread) {

InternalThreadLocalMap threadLocalMap = thread.threadLocalMap(); // 获取 FastThreadLocalThread 的 threadLocalMap 属性

if (threadLocalMap == null) {
thread.setThreadLocalMap(threadLocalMap = new InternalThreadLocalMap());
}

return threadLocalMap;

}

private static InternalThreadLocalMap slowGet() {

ThreadLocal<InternalThreadLocalMap> slowThreadLocalMap = UnpaddedInternalThreadLocalMap.slowThreadLocalMap;
InternalThreadLocalMap ret = slowThreadLocalMap.get(); // 从 JDK 原生 ThreadLocal 中获取 InternalThreadLocalMap

if (ret == null) {
// 如果为空,则先设置值
ret = new InternalThreadLocalMap();
slowThreadLocalMap.set(ret);
}

return ret;

}

InternalThreadLocalMap.get() 逻辑很简单,如果当前线程是 FastThreadLocalThread 类型,那么直接通过 fastGet() 方法获取 FastThreadLocalThread 的 threadLocalMap 属性即可。如果此时 InternalThreadLocalMap 不存在,直接创建一个返回。

关于 InternalThreadLocalMap 的初始化在上文中已经介绍过,它会初始化一个长度为 32 的 Object 数组,数组中填充着 32 个缺省对象 UNSET 的引用。

而如果当前线程不是 FastThreadLocalThread 类型,则会调用 slowGet() 方法来获取。当嵌线程不是FastThreadLocalThread 类型时,线程内部是没有 InternalThreadLocalMap 属性的,Netty 在 UnpaddedInternalThreadLocalMap 中保存了一个 JDK 原生的 ThreadLocal,ThreadLocal 中存放着 InternalThreadLocalMap,此时获取 InternalThreadLocalMap 就退化成 JDK 原生的 ThreadLocal 获取。

获取 InternalThreadLocalMap 的过程已经讲完了,下面看下 setKnownNotUnset() 如何将数据添加到 InternalThreadLocalMap 的。

setKnownNotUnset()

方法源码:

1
2
3
4
5
6
7
private void setKnownNotUnset(InternalThreadLocalMap threadLocalMap, V value) {

if (threadLocalMap.setIndexedVariable(index, value)) { // 1. 找到数组下标 index 位置,设置新的 value
addToVariablesToRemove(threadLocalMap, this); // 2. 将 FastThreadLocal 对象保存到待清理的 Set 中
}

}

setKnownNotUnset() 主要做了两件事:

  1. 找到数组下标 index 位置,设置新的 value。
  2. 将 FastThreadLocal 对象保存到待清理的 Set 中。

首先我们看下第一步 threadLocalMap.setIndexedVariable() 的源码实现:

1
2
3
4
5
6
7
8
9
10
11
12
13
14
15
16
17
18
public boolean setIndexedVariable(int index, Object value) {

Object[] lookup = indexedVariables;

if (index < lookup.length) {

Object oldValue = lookup[index];
lookup[index] = value; // 直接将数组 index 位置设置为 value,时间复杂度为 O(1)
return oldValue == UNSET;

} else {

expandIndexedVariableTableAndSet(index, value); // 容量不够,先扩容再设置值
return true;

}

}

indexedVariables 就是 InternalThreadLocalMap 中用于存放数据的数组,如果数组容量大于 FastThreadLocal 的 index 索引,那么直接找到数组下标 index 位置将新 value 设置进去,事件复杂度为 O(1)。在设置新的 value 之前,会将之前 index 位置的元素取出,如果旧的元素还是 UNSET 缺省对象,那么返回成功。

如果数组容量不够了怎么办呢?InternalThreadLocalMap 会自动扩容,然后再设置 value。接下来看看 expandIndexedVariableTableAndSet() 的扩容逻辑:

1
2
3
4
5
6
7
8
9
10
11
12
13
14
15
16
17
18
19
20
private void expandIndexedVariableTableAndSet(int index, Object value) {

Object[] oldArray = indexedVariables;

final int oldCapacity = oldArray.length;

int newCapacity = index;
newCapacity |= newCapacity >>> 1;
newCapacity |= newCapacity >>> 2;
newCapacity |= newCapacity >>> 4;
newCapacity |= newCapacity >>> 8;
newCapacity |= newCapacity >>> 16;
newCapacity ++;

Object[] newArray = Arrays.copyOf(oldArray, newCapacity);
Arrays.fill(newArray, oldCapacity, newArray.length, UNSET);
newArray[index] = value;
indexedVariables = newArray;

}

上述代码的位移操作是不是似曾相识?我们去翻阅下 JDK HashMap 中扩容的源码,其中有这么一段代码:

1
2
3
4
5
6
7
8
9
10
11
12
static final int tableSizeFor(int cap) {

int n = cap - 1;
n |= n >>> 1;
n |= n >>> 2;
n |= n >>> 4;
n |= n >>> 8;
n |= n >>> 16;

return (n < 0) ? 1 : (n >= MAXIMUM_CAPACITY) ? MAXIMUM_CAPACITY : n + 1;

}

可以看出 InternalThreadLocalMap 实现数组扩容几乎和 HashMap 完全是一模一样的。InternalThreadLocalMap 以 index 为基准进行扩容,将数组扩容后的容量向上取整为 2 的次幂。然后将原数组内容拷贝到新的数组中,空余部分填充缺省对象 UNSET,最终把新数组赋值给 indexedVariables。

为什么 InternalThreadLocalMap 以 index 为基准进行扩容,而不是原数组长度呢?假设现在初始化了 70 个 FastThreadLocal,但是这些 FastThreadLocal 从来没有调用过 set() 方法,此时数组还是默认长度 32。当第 index = 70 的 FastThreadLocal 调用 set() 方法时,如果按原数组容量 32 进行扩容 2 倍后,还是无法填充 index = 70 的数据。所以使用 index 为基准进行扩容可以解决这个问题,但是如果 FastThreadLocal 特别多,数组的长度也是非常大的。

回到 setKnownNotUnset() 的主流程,向 InternalThreadLocalMap 添加完数据之后,接下就是将 FastThreadLocal 对象保存到待清理的 Set 中。我们继续看下 addToVariablesToRemove() 是如何实现的。

1
2
3
4
5
6
7
8
9
10
11
12
13
14
15
private static void addToVariablesToRemove(InternalThreadLocalMap threadLocalMap, FastThreadLocal<?> variable) {

Object v = threadLocalMap.indexedVariable(variablesToRemoveIndex); // 获取数组下标为 0 的元素
Set<FastThreadLocal<?>> variablesToRemove;

if (v == InternalThreadLocalMap.UNSET || v == null) {
variablesToRemove = Collections.newSetFromMap(new IdentityHashMap<FastThreadLocal<?>, Boolean>()); // 创建 FastThreadLocal 类型的 Set 集合
threadLocalMap.setIndexedVariable(variablesToRemoveIndex, variablesToRemove); // 将 Set 集合填充到数组下标 0 的位置
} else {
variablesToRemove = (Set<FastThreadLocal<?>>) v; // 如果不是 UNSET,Set 集合已存在,直接强转获得 Set 集合
}

variablesToRemove.add(variable); // 将 FastThreadLocal 添加到 Set 集合中

}

variablesToRemoveIndex 是采用 static final 修饰的变量,在 FastThreadLocal 初始化时 variablesToRemoveIndex 被赋值为 0。InternalThreadLocalMap 首先会找到数组下标为 0 的元素,如果该元素是缺省对象 UNSET 或者不存在,那么会创建一个 FastThreadLocal 类型的 Set 集合,然后把 Set 集合填充到数组下标 0 的位置。如果数组第一个元素不是缺省对象 UNSET,说明 Set 集合已经被填充,直接强转获得 Set 集合即可。这就解释了 InternalThreadLocalMap 的 value 数据为什么是从下标为 1 的位置开始存储了,因为 0 的位置已经被 Set 集合占用了。

为什么 InternalThreadLocalMap 要在数组下标为 0 的位置存放一个 FastThreadLocal 类型的 Set 集合呢?这时候我们回过头看下 remove() 方法。

remove()

方法源码:

1
2
3
4
5
6
7
8
9
10
11
12
13
14
15
16
17
18
19
20
21
22
23
24
25
26
27
28
29
30
31
32
33
34
35
36
37
public final void remove() {

remove(InternalThreadLocalMap.getIfSet());

}

public static InternalThreadLocalMap getIfSet() {

Thread thread = Thread.currentThread();

if (thread instanceof FastThreadLocalThread) {
return ((FastThreadLocalThread) thread).threadLocalMap();
}

return slowThreadLocalMap.get();

}

public final void remove(InternalThreadLocalMap threadLocalMap) {

if (threadLocalMap == null) {
return;
}

Object v = threadLocalMap.removeIndexedVariable(index); // 删除数组下标 index 位置对应的 value
removeFromVariablesToRemove(threadLocalMap, this); // 从数组下标 0 的位置取出 Set 集合,并删除当前 FastThreadLocal

if (v != InternalThreadLocalMap.UNSET) {
try {
onRemoval((V) v); // 空方法,用户可以继承实现
} catch (Exception e) {
PlatformDependent.throwException(e);
}

}

}

在执行 remove 操作之前,会调用 InternalThreadLocalMap.getIfSet() 获取当前 InternalThreadLocalMap。有了之前的基础,理解 getIfSet() 方法就非常简单了,如果是 FastThreadLocalThread 类型,直接取 FastThreadLocalThread 中 threadLocalMap 属性。如果是普通线程 Thread,从 ThreadLocal 类型的 slowThreadLocalMap 中获取。

找到 InternalThreadLocalMap 之后,InternalThreadLocalMap 会从数组中定位到下标 index 位置的元素,并将 index 位置的元素覆盖为缺省对象 UNSET。接下来就需要清理当前的 FastThreadLocal 对象,此时 Set 集合就派上了用场,InternalThreadLocalMap 会取出数组下标 0 位置的 Set 集合,然后删除当前 FastThreadLocal。

最后 onRemoval() 方法起到什么作用呢?Netty 只是留了一处扩展,并没有实现,用户需要在删除的时候做一些后置操作,可以继承 FastThreadLocal 实现该方法。

FastThreadLocal.get()

方法源码:

1
2
3
4
5
6
7
8
9
10
11
12
13
14
15
16
17
18
19
20
21
22
23
24
25
26
27
28
29
30
31
32
33
34
35
36
37
38
39
40
41
42
43
44
45
public final V get() {

InternalThreadLocalMap threadLocalMap = InternalThreadLocalMap.get();

Object v = threadLocalMap.indexedVariable(index); // 从数组中取出 index 位置的元素

if (v != InternalThreadLocalMap.UNSET) {

return (V) v;

}

return initialize(threadLocalMap); // 如果获取到的数组元素是缺省对象,执行初始化操作

}

public Object indexedVariable(int index) {

Object[] lookup = indexedVariables;

return index < lookup.length? lookup[index] : UNSET;

}

private V initialize(InternalThreadLocalMap threadLocalMap) {

V v = null;

try {

v = initialValue();

} catch (Exception e) {

PlatformDependent.throwException(e);

}

threadLocalMap.setIndexedVariable(index, v);

addToVariablesToRemove(threadLocalMap, this);

return v;

}

首先根据当前线程是否是 FastThreadLocalThread 类型找到 InternalThreadLocalMap,然后取出从数组下标 index 的元素,如果 index 位置的元素不是缺省对象 UNSET,说明该位置已经填充过数据,直接取出返回即可。如果 index 位置的元素是缺省对象 UNSET,那么需要执行初始化操作。可以看到,initialize() 方法会调用用户重写的 initialValue 方法构造需要存储的对象数据,如下所示。

1
2
3
4
5
6
7
8
9
10
11
private final FastThreadLocal<String> threadLocal = new FastThreadLocal<String>() {

@Override

protected String initialValue() {

return "hello world";

}

};

构造完用户对象数据之后,接下来就会将它填充到数组 index 的位置,然后再把当前 FastThreadLocal 对象保存到待清理的 Set 中。添加的过程和之前一致,不再赘述。

总结

到此为止,FastThreadLocal 最核心的两个方法 set()/get() 已经分析完了。下面有两个问题我们再深入思考下。

  1. FastThreadLocal 真的一定比 ThreadLocal 快吗?答案是不一定的,只有使用FastThreadLocalThread 类型的线程才会更快,如果是普通线程反而会更慢。
  2. FastThreadLocal 会浪费很大的空间吗?虽然 FastThreadLocal 采用的空间换时间的思路,但是在 FastThreadLocal 设计之初就认为不会存在特别多的 FastThreadLocal 对象,而且在数据中没有使用的元素只是存放了同一个缺省对象的引用,并不会占用太多内存空间。

相对于 ThreadLocal,简单总结下 FastThreadLocal 的优势。

  • 高效查找。FastThreadLocal 在定位数据的时候可以直接根据数组下标 index 获取,时间复杂度 O(1)。而 JDK 原生的 ThreadLocal 在数据较多时哈希表很容易发生 Hash 冲突,线性探测法在解决 Hash 冲突时需要不停地向下寻找,效率较低。此外,FastThreadLocal 相比 ThreadLocal 数据扩容更加简单高效,FastThreadLocal 以 index 为基准向上取整到 2 的次幂作为扩容后容量,然后把原数据拷贝到新数组。而 ThreadLocal 由于采用的哈希表,所以在扩容后需要再做一轮 rehash。
  • 安全性更高。JDK 原生的 ThreadLocal 使用不当可能造成内存泄漏,只能等待线程销毁。在使用线程池的场景下,ThreadLocal 只能通过主动检测的方式防止内存泄漏,从而造成了一定的开销。然而 FastThreadLocal 不仅提供了 remove() 主动清除对象的方法,而且在线程池场景中 Netty 还封装了 FastThreadLocalRunnable,FastThreadLocalRunnable 最后会执行 FastThreadLocal.removeAll() 将 Set 集合中所有 FastThreadLocal 对象都清理掉,