单例模式 定义 : 一个类在系统中只产生一个实例
优点 : 对于频繁使用的对象,可以省略new的时间,对于重量级对象来说是一比客观的系统性能提升 内存使用频率低,减少GC次数,缩短GC停顿时间
示例:
1 2 3 4 5 6 7 8 9 10 11 12 13 14 15 16 17 18 19 20 21 22 23 24 25 26 27 28 29 30 31 32 33 34 35 36 37 38 39 40 41 42 public class Singleton public static int STATUS=1 ; private Singleton () System.out.println("Singleton is create" ); } private static Singleton instance = new Singleton(); public static Singleton getInstance () return instance; } } public class LazySingleton private LazySingleton () System.out.println("LazySingleton is create" ); } private static LazySingleton instance = null ; public static synchronized LazySingleton getInstance () if (instance == null ) instance = new LazySingleton(); return instance; } } public class StaticSingleton public static int STATUS; private StaticSingleton () System.out.println("StaticSingleton is create" ); } private static class SingletonHolder private static StaticSingleton instance = new StaticSingleton(); } public static StaticSingleton getInstance () return SingletonHolder.instance; } }
不变模式 定义 : 一个对象一旦被创建,内部状态永远不发生改变,故永远为线程安全的使用场景: 对象创建后,内部状态和数据不再发生变化,对象需要被共享,被多线程频繁访问
1
2
3
4
5
6
7
8
9
10
11
12
13
14
15
16
public final class PCData private final int intData; public PCData (int d) intData=d; } public PCData (String d) intData=Integer.valueOf(d); } public int getData () return intData; } @Override public String toString () return "data:" +intData; } }
注意 “:String 类也是不变模式,保证了在多线程下的性能
生产者消费者模式 定义 : 生产者负责提交用户请求,消费者负责具体处理生产者提交的任务.生产者和消费者之间通过共享内存缓冲区进行通信.特点 : 对生产者线程和消费者线程进行解耦,优化系统整体结构,环节性能瓶颈对系统性能的影响
1 2 3 4 5 6 7 8 9 10 11 12 13 14 15 16 17 18 19 20 21 22 23 24 25 26 27 28 29 30 31 32 33 34 35 36 37 38 39 40 41 42 43 44 45 46 47 48 49 50 51 52 53 54 55 56 57 58 59 60 61 62 63 64 65 66 67 68 69 70 71 72 73 74 75 76 77 78 79 80 81 82 83 84 85 86 87 88 89 90 91 92 93 94 95 96 97 98 99 public final class PCData private final int intData; public PCData (int d) intData=d; } public PCData (String d) intData=Integer.valueOf(d); } public int getData () return intData; } @Override public String toString () return "data:" +intData; } } public class Producer implements Runnable private volatile boolean isRunning = true ; private BlockingQueue<PCData> queue; private static AtomicInteger count = new AtomicInteger(); private static final int SLEEPTIME = 1000 ; public Producer (BlockingQueue<PCData> queue) this .queue = queue; } public void run () PCData data = null ; Random r = new Random(); System.out.println("start producer id=" +Thread.currentThread().getId()); try { while (isRunning) { Thread.sleep(r.nextInt(SLEEPTIME)); data = new PCData(count.incrementAndGet()); System.out.println(data+" is put into queue" ); if (!queue.offer(data, 2 , TimeUnit.SECONDS)) { System.err.println("failed to put data:" + data); } } } catch (InterruptedException e) { e.printStackTrace(); Thread.currentThread().interrupt(); } } public void stop () isRunning = false ; } } public class Consumer implements Runnable private BlockingQueue<PCData> queue; private static final int SLEEPTIME = 1000 ; public Consumer (BlockingQueue<PCData> queue) this .queue = queue; } public void run () System.out.println("start Consumer id=" + Thread.currentThread().getId()); Random r = new Random(); try { while (true ){ PCData data = queue.take(); if (null != data) { int re = data.getData() * data.getData(); System.out.println(MessageFormat.format("{0}*{1}={2}" , data.getData(), data.getData(), re)); Thread.sleep(r.nextInt(SLEEPTIME)); } } } catch (InterruptedException e) { e.printStackTrace(); Thread.currentThread().interrupt(); } } } public class PCMain public static void main (String[] args) throws InterruptedException BlockingQueue<PCData> queue = new LinkedBlockingQueue<PCData>(10 ); Producer producer1 = new Producer(queue); Producer producer2 = new Producer(queue); Producer producer3 = new Producer(queue); Consumer consumer1 = new Consumer(queue); Consumer consumer2 = new Consumer(queue); Consumer consumer3 = new Consumer(queue); ExecutorService service = Executors.newCachedThreadPool(); service.execute(producer1); service.execute(producer2); service.execute(producer3); service.execute(consumer1); service.execute(consumer2); service.execute(consumer3); Thread.sleep(10 * 1000 ); producer1.stop(); producer2.stop(); producer3.stop(); Thread.sleep(3000 ); service.shutdown(); } }
生产者消费模式:无锁实现
上述BlockingQueue基于锁和阻塞等待来实现线程同步,在高并发环境下性能有限.
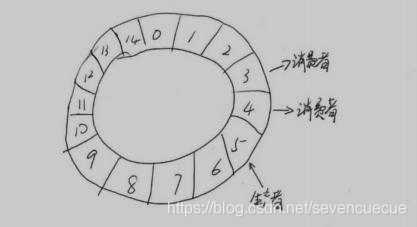
无锁缓存框架Disruptor 特点 : 环形队列,队列大小需要事先指定,无法动态扩展,数组大小需设置为2的整数次方.内存复用度高,减少GC等消耗
结构 : RingBuffer的结构在写入和读取的操作时,均使用CAS进行数据保护.
示例代码:
1 2 3 4 5 6 7 8 9 10 11 12 13 14 15 16 17 18 19 20 21 22 23 24 25 26 27 28 29 30 31 32 33 34 35 36 37 38 39 40 41 42 43 44 45 46 47 48 49 50 51 52 53 54 55 56 57 58 59 60 61 62 63 64 65 66 67 68 69 70 71 72 73 74 public class PCData private long value; public void set (long value) { this .value = value; } public long get () return value; } } public class Consumer implements WorkHandler <PCData > @Override public void onEvent (PCData event) throws Exception System.out.println(Thread.currentThread().getId() + ":Event: --" + event.get() * event.get() + "--" ); } } public class PCDataFactory implements EventFactory <PCData > public PCData newInstance () return new PCData(); } } public class Producer private final RingBuffer<PCData> ringBuffer; public Producer (RingBuffer<PCData> ringBuffer) this .ringBuffer = ringBuffer; } public void pushData (ByteBuffer bb) long sequence = ringBuffer.next(); try { PCData event = ringBuffer.get(sequence); event.set(bb.getLong(0 )); } finally { ringBuffer.publish(sequence); } } } public class PCMain public static void main (String[] args) throws Exception Executor executor = Executors.newCachedThreadPool(); PCDataFactory factory = new PCDataFactory(); int bufferSize = 1024 ; Disruptor<PCData> disruptor = new Disruptor<PCData>(factory, bufferSize, executor, ProducerType.MULTI, new BlockingWaitStrategy() ); disruptor.handleEventsWithWorkerPool( new Consumer(), new Consumer(), new Consumer(), new Consumer()); disruptor.start(); RingBuffer<PCData> ringBuffer = disruptor.getRingBuffer(); Producer producer = new Producer(ringBuffer); ByteBuffer bb = ByteBuffer.allocate(8 ); for (long l = 0 ; true ; l++) { bb.putLong(0 , l); producer.pushData(bb); Thread.sleep(100 ); System.out.println("add data " + l); } } }
Disruptor中消费者监控缓存区的策略 消费者如何监控缓冲区中的信息呢,以下给出了4种策略,这些策略由WaitStrategy接口进行封装
BlcokingWaitStrategy : 默认策略,类似BlockingQueue,利用锁和条件(Condition)进行数据的监控和线程的唤醒, 最节省CPU,但高并发下性能最差SleepingWaitStrategy : 与上述类似.它会在循环中不断等待,先进行自旋等待,若不成功,则会使用Thread.yield()方法让出cpu,并最终使用LockSupport.parkNanos进行线程休眠.因此这个策略对数据处理可能会产生较高的平均延迟,适合对延时要求不高的场合,且对生产者线程的影响最小.典型场景为异步日志.YieldingWaitingStrategy : 这个策略用于低延时的场合。消费者线程会不断循环监控缓冲区的变化,在循环内部,它会使用Thread.yield方法让出CPU给别的线程执行时间。如果你需要一个高性能的系统,并且对延时有较为严格的要求,则可以考虑这种策略。使用这种策略时,相当于消费者线程变成了一个内部执行了Thread.yield方法的死循环。因此,你最好有多于消费者线程数量的逻辑CPU数量(这里的逻辑CPU指的是“双核四线程”中的那个四线程,否则,整个应用程序恐怕都会受到影响).BusySpinWaitStrategy : 这个是最疯狂的等待策略了。它就是一个死循环!消费者线程会尽最大努力疯狂监控缓冲区的变化。因此,它会吃掉所有的CPU资源。只有对延迟非常苛刻的场合可以考虑使用它(或者说,你的系统真的非常繁忙)。因为使用它等于开启了一个死循环监控,所以你的物理CPU数量必须要大于消费者的线程数。注意,我这里说的是物理CPU,如果你在一个物理核上使用超线程技术模拟两个逻辑核,另外一个逻辑核显然会受到这种超密集计算的影响而不能正常工作。
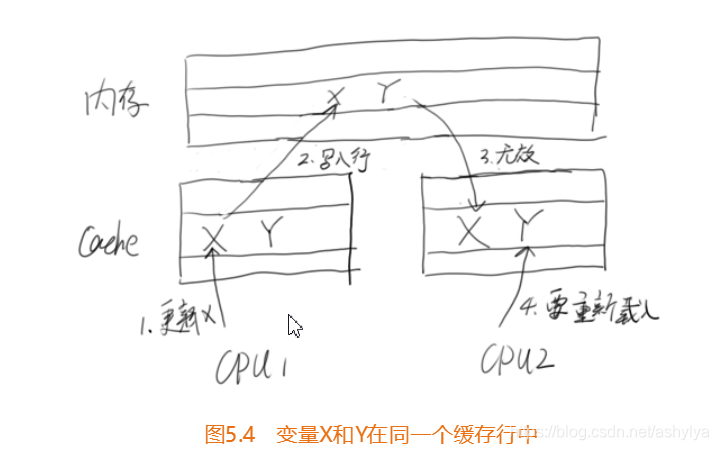
Disruptor中cpu cache的优化: 解决伪共享问题 什么是伪共享问题呢?我们知道,为了提高CPU的速度,CPU有一个高速缓存Cache。在高速缓存中,读写数据的最小单位为缓存行(Cache Line),它是从主存(Memory)复制到缓存(Cache)的最小单位,一般为32字节到128字节。
当两个变量存放在一个缓存行时,在多线程访问中,可能会影响彼此的性能。在图5.4中,假设变量X和Y在同一个缓存行,运行在CPU1上的线程更新了变量X,那么CPU2上的缓存行就会失效,同一行的变量Y即使没有修改也会变成无效,导致Cache无法命中。接着,如果在CPU2上的线程更新了变量Y,则导致CPU1上的缓存行失效(此时,同一行的变量X变得无法访问)。这种情况反复发生,无疑是一个潜在的性能杀手。如果CPU经常不能命中缓存,那么系统的吞吐量就会急剧下降。
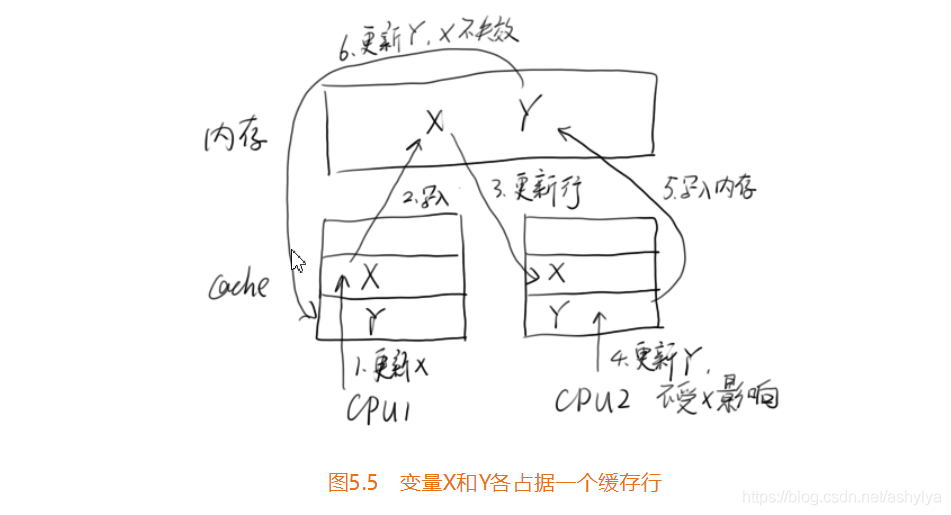
为了避免这种情况发生,一种可行的做法就是在变量X的前后空间都先占据一定的位置(把它叫作padding,用来填充用的)。这样,当内存被读入缓存时,这个缓存行中,只有变量X一个变量实际是有效的,因此就不会发生多个线程同时修改缓存行中不同变量而导致变量全体失效的情况,如图5.5所示。(即x占一个缓存行,Y占一个缓存行)。
Future模式 概述 Future模式是多线程开发中非常常见的一种设计模式,它的核心思想是异步调用。当我们需要调用一个函数方法时,如果这个函数执行得很慢,那么我们就要进行等待。但有时候,我们可能并不急着要结果。因此,我们可以让被调者立即返回,让它在后台慢慢处理这个请求。对于调用者来说,则可以先处理一些其他任务,在真正需要数据的场合再去尝试获得需要的数据。
对于Future模式来说,虽然它无法立即给出你需要的数据,但是它会返回一个契约给你,将来你可以凭借这个契约去重新获取你需要的信息。
Future的简单实现 1 2 3 4 5 6 7 8 9 10 11 12 13 14 15 16 17 18 19 20 21 22 23 24 25 26 27 28 29 30 31 32 33 34 35 36 37 38 39 40 41 42 43 44 45 46 47 48 49 50 51 52 53 54 55 56 57 58 59 60 61 62 63 64 65 66 67 68 69 70 71 72 73 74 75 76 public interface Data public String getResult () } public class FutureData implements Data protected RealData realdata = null ; protected boolean isReady = false ; public synchronized void setRealData (RealData realdata) if (isReady) { return ; } this .realdata = realdata; isReady = true ; notifyAll(); } public synchronized String getResult () while (!isReady) { try { wait(); } catch (InterruptedException e) { } } return realdata.result; } } public class RealData implements Data protected final String result; public RealData (String para) StringBuffer sb = new StringBuffer(); for (int i = 0 ; i < 10 ; i++) { sb.append(para); try { Thread.sleep(100 ); } catch (InterruptedException e) { } } result = sb.toString(); } public String getResult () return result; } } public class Client public Data request (final String queryStr) final FutureData future = new FutureData(); new Thread() { public void run () RealData realdata = new RealData(queryStr); future.setRealData(realdata); } }.start(); return future; } } public class Main public static void main (String[] args) Client client = new Client(); Data data = client.request("a" ); System.out.println("请求完毕" ); try { Thread.sleep(2000 ); } catch (InterruptedException e) { } System.out.println("数据 = " + data.getResult()); } }
JDK中的Future 1 2 3 4 5 6 7 8 9 10 11 ExecutorService executorService = Executors.newFixedThreadPool(10 ); Future<?> future = executorService.submit(() -> { try { Thread.currentThread().sleep(5000 ); } catch (InterruptedException e) { e.printStackTrace(); Thread.currentThread().interrupt(); } }); future.get(); System.out.println("处理完毕" );
Guava对Future的支持 1 2 3 4 5 6 7 8 9 10 11 12 13 14 15 16 public class FutrueDemo2 public static void main (String[] args) throws InterruptedException ListeningExecutorService service = MoreExecutors.listeningDecorator(Executors.newFixedThreadPool(10 )); ListenableFuture<String> task = service.submit(new RealData("x" )); Futures.addCallback(task, new FutureCallback<String>() { public void onSuccess (String o) System.out.println("异步处理成功,result=" + o); } public void onFailure (Throwable throwable) System.out.println("异步处理失败,e=" + throwable); } }, MoreExecutors.newDirectExecutorService()); System.out.println("main task done....." ); Thread.sleep(3000 ); } }